
So I am tired of having to look through multiple video tutorials, so I’m making this to remind myself of the steps. I’ll link to the tutorial I followed for each of the steps. I’ll assume you already have a model made in VRoid, so I won’t cover how I made mine.
Before you start, you will needs these (be aware of the versions):
Unity 2019 (2019.4.31): https://unity3d.com/get-unity/download/archive
Blender 2.92/ 83: https://www.blender.org/download/releases/2-92/
VRM Importer: https://github.com/saturday06/VRM_Addon_for_Blender
CATS: https://github.com/absolute–quantum/cats-blender–plugin
Material-combiner-addon: https://github.com/Grim-es/material-combiner-addon
VRChat SDK 3: https://vrchat.com/home/download
VRoid:
Try to limit the hair bones, it can make the avatar harder to optimize.
I recommend cleaning up the textures in VRoid before exporting it to Blender. Go into texture editor, and see if any textures overlap. Where there is overlap, for example arms under the jacket, you don’t need the arm texture. Go to “skin mask” and paint the parts you don’t need black.

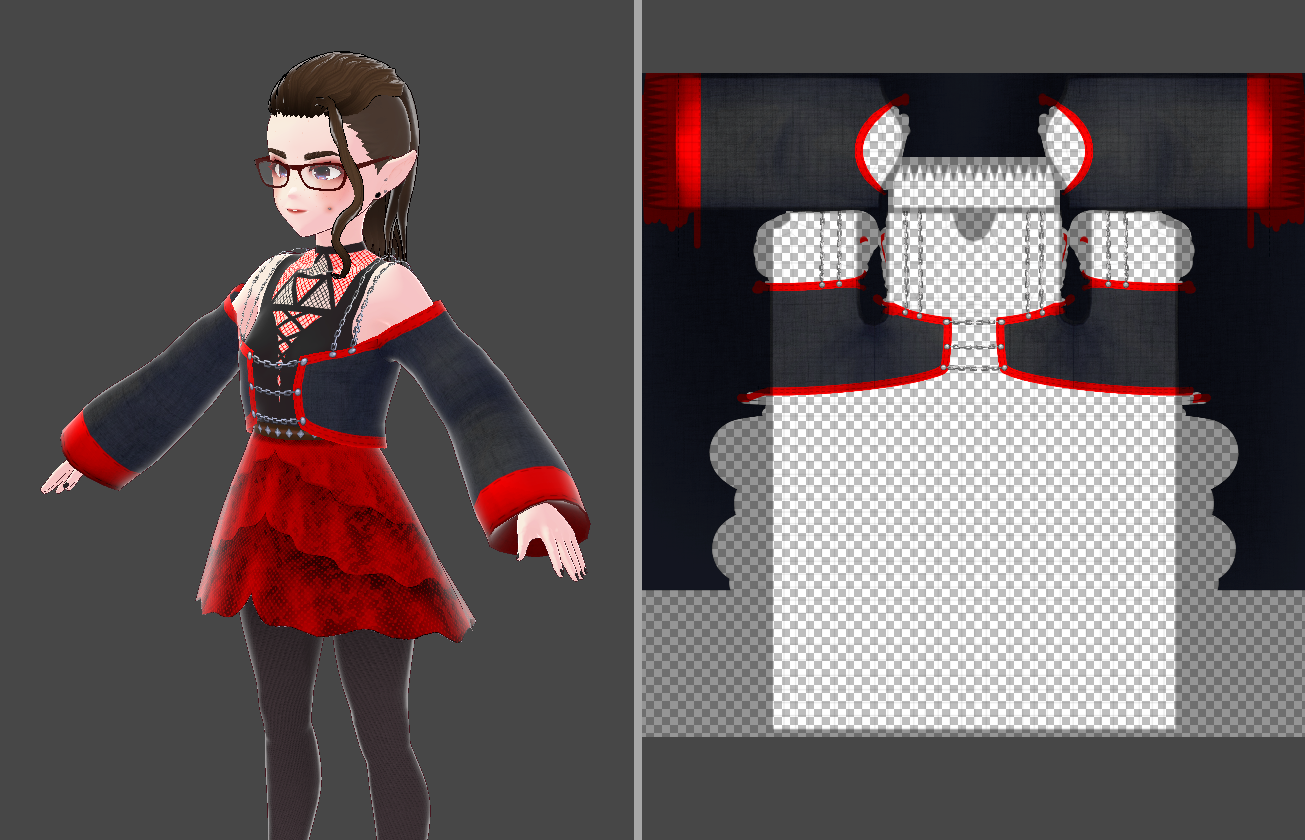
Another thing I usually do is have a look at the model while it’s animating. In the top right, you can click on the camera icon. Go to the animation tab and look through the different animations and look for clipping in the texture, and ajust until it looks nice.
When you are ready, export as VRM, You can reduce the polygons enough to where you still think it looks nice.
Blender:
Start by setting up blender with all the add-ons needed. If you don’t know how, you can check these two videos out:
- VRoid to VRChat (Unity 2019 + Blender) BEGINNER TUTORIAL (https://youtu.be/iIEpCN4na9I)
- How to Optimize your VRoid Model for VRChat using VRoid Studio and Blender (https://youtu.be/PyRmBKBCq9k)
Open a new file in blender, and delete everything in the scene (press A, then del or X).
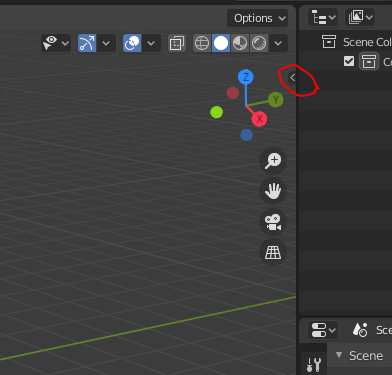
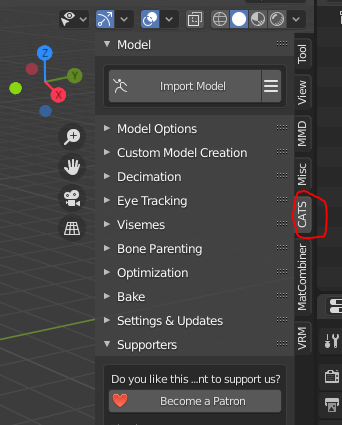
Expand this arrow, and go down to CATS. Click on the button next to “Import model” and choose to import VRM.
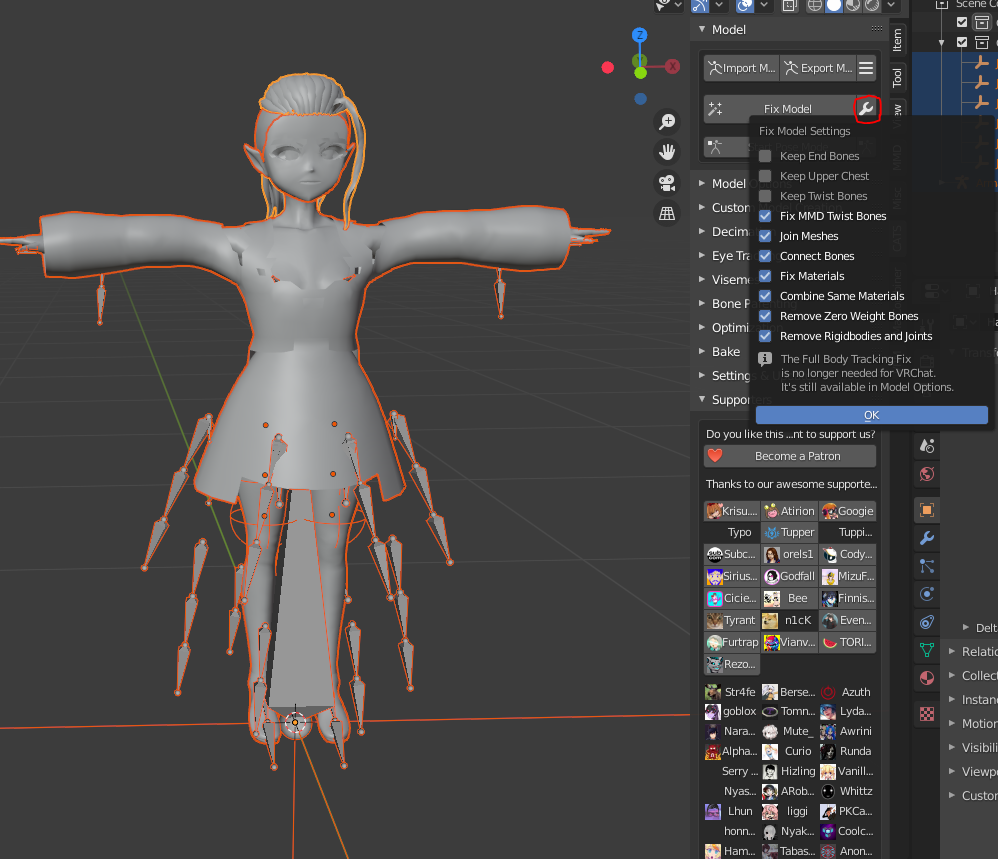
The model should look like this after the import. The next thing to do is to press the wrench icon and make sure the same things are checked as in the image, and then press “fix model”.
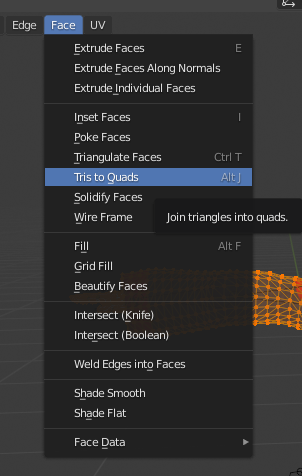
Next, we want to optimize the polygons a bit more, so click on the arrow next to armature, and select the body. Go into edit mode (tab) and click on faces -> tris to sqads
At this point, you might want to save your file. The next step causes crashes for me, so be aware that it can happen. In the CATS tab, go to “Model options”, and then click on the material tab. This will separate the materials from each other. This allows us to delete parts not seen or needed. We already did a bit of this step in VRoid, we can go over spots we missed now.
Start by selecting in the scene hierarchy, the material you want to remove parts of. Go into edit mode, and be sure to toggle X ray (it’s an icon above where the CATS tab is). On the left there should be a toolbar with the top being different options of selections, pick whichever one works best for you and start selecting the parts you want gone. Hold shift while you do this. If you select too much, you can use CTRL to deselect. When you are happy with the selection, press P and click selection. This will make the material a new mesh, which you can delete in the scene hierarchy.
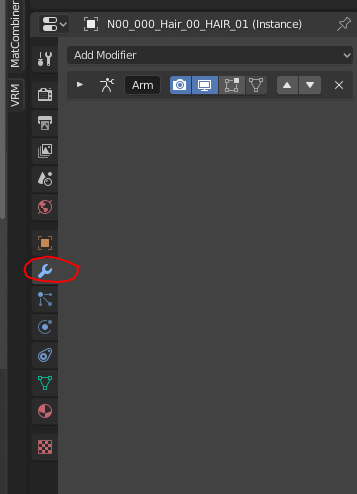
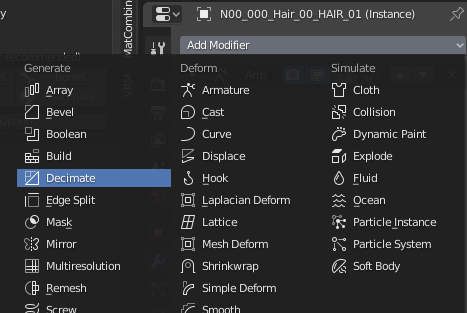
To further reduce polygons, to into object mode and select the hair. Go to Modifier and add a new modifier called Desimate.
Ajust the ratio slider until you are happy enough with the reduction. You don’t have to do this on the clothing, but you can if you want to.
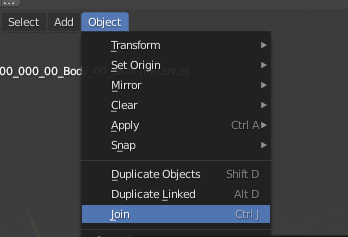
After this, you need to join the meshes together. Do this by clicking the first mesh, and shift-clicking on the last one to select them all in one go. Go into object mode and select join under the “object” tab.
Remember to rename this mesh “Body”.
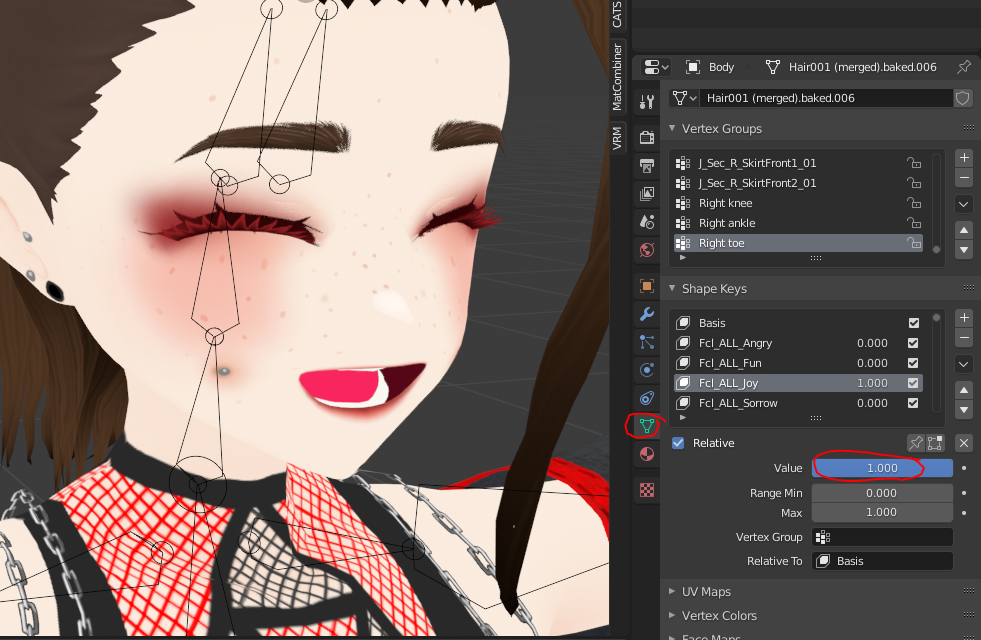
We then need to test the blendshapes. This can be done by selecting the body mesh, and then going to the object detail properties tab.
Select the shape you want to check, and ajust the value to see if it works. Remember to set the value back to 0.
Next up is the eye-tracking. In CATS, go to “Eye tracking”, and make sure that the bones are assigned correctly. For the blinking, assign the eye close blendshape that match. Click on “create eye tracking”, and test to make sure that the eyes moves as they should.
Next up is Visimes. Add the visimes that match each other. The cisime CH can be either E or I. Click on create visimes. Remember to save.
Next you can click on “optimization”, and select Atlas, and click generate material list. By doing this, you can combine different materials together and apply the same shader to them. It will also make things easier in VRchat if you have as few materials as possible.
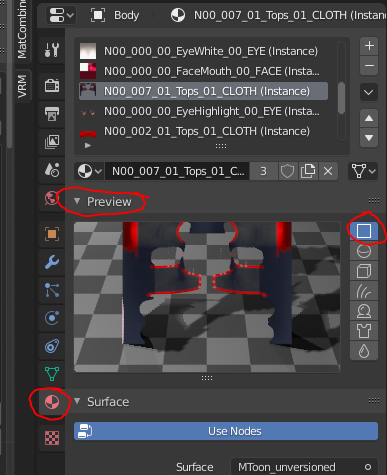
To check your materials, you can go to the material properties tab, and select the material in the list. Click on preview and change the preview render type to Flat XY plane.
I have one atlas for the face, one for the hair and one for the body.
In VRchat, you might get inward-bending knees. To prevent this, you can simply bed the legs slightly. Click on the armature in the scene hierarchy. This will put you into edit mode. Look at the model from the side (numpad 3), and click and drag over the knee joints to select them. Press G and move them slightly forwards, so that the knee is slightly bent.
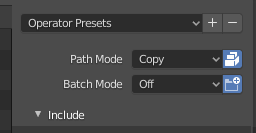
Export time! Click on export model, and make sure the path mode is set to Copy, and that the icon next to it is selected.
Unity
Set up unity as the videos suggest, with the VRCSDK and shader assets:
- VRoid to VRChat (Unity 2019 + Blender) BEGINNER TUTORIAL (https://youtu.be/iIEpCN4na9I)
- How to Optimize your VRoid Model for VRChat using VRoid Studio and Blender (https://youtu.be/PyRmBKBCq9k)
Drag the avatar into the assets folder in unity, and then into your scene hierarchy. Click on the avatar and go into materials, and click on “extract textures” and make a folder for the textures, and do the same with materials.
Go into Rig, and switch it from generic to humanoid, and click apply. Click on configure next, and go into the head bones and delete the jaw-bone from list under mapping. Click apply and done.
Next go into the texture folder and check “alpha is transparency”. Then go into materials and apply the poiyomi shader, and select whichever mode works better. In my experience cutout works nicely. If the material looks like it only works on one side, give it an outline. You can play around with the poiyomi shader and select whatever looks the best.
The next step is to click on the avatar in the scene, click on add component and add VRC avatar descriptor. Edit the view-position to be between the eyes. Then click on auto-detect for the lip sync, and just check to see that everything matches.
If you want the character to look around on it’s own, follow this step:
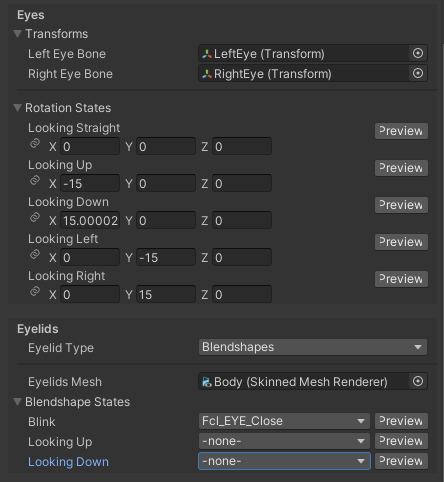
Next click on Enable eye look. Instead of adding the left eye bone, add the standalone lefteye as seen in the picture. The rotation states should be something along the lines of what’s in the picture. The rest should be filled like in the picture.
The avatar should be good enough now to be uploaded to VRchat! I want to add some expressions, so I will cover that here as well.
Expressions
Full tutorial: VRChat Avatar 3.0 Tutorial – Adding Facial Expressions to your Avatar (https://youtu.be/UU9NFJz2qls)
Start by duplicating the avatar (CTRL + D), and open the animation window. You want to create a new animation. Create a new folder and give the animation a fitting name. Find the blendshapes in body, and press the record button to start recording the animation. Create however many you want.
The next part is different depending on how you plan to activate the expressions. I use VRchat on PC, so I want an expression meny. So let’s start with an animator controller. Right click in your assets folder and create a new animation controller. Name it “FX” and drag it into the FX property under “playable layers” in your avatar descriptor. Right click again and create a new VRCExpressionParameters and VRCExpressionMenu and name them as you see fit. Go to the avatar descriptor again and put them under “Expressions”.
Next up I’m gonna go into the parameter, and add a new parameter called “FaceInt”, with the type being Int. Click on “FX”, and open the Parametar tab in the animator. Click on the +, and add a new Int and call it “FaceInt”, and be sure to spell it the same as the one you just made. Go to layers and make a new layer with a weight of 1, you can call the layer “Face Toggles”.
Create an empty state in this layer, and call it Idle. Create an transition between “Any state” and “Idle”, where the condition is “FaceInt = 0”. Drag the animations into the controller, and create a transition from “Any state” to each animation. The condition should be “FaceInt = __”, where it starts at 1 and increases for each animation. Expand the settings, and make the transition duration 0.1, and make sure the exit time is disabled.
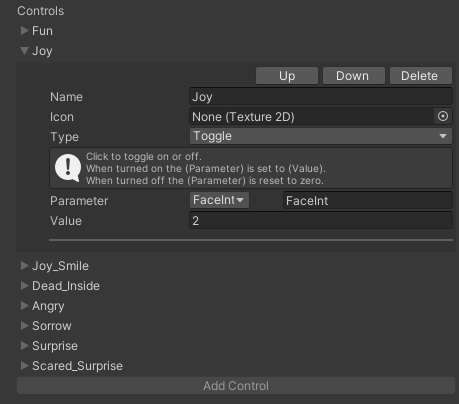
In the menu object, create a new controll and create a sub menu. Create a new VRCExpression menu and name it FaceExpressions, and put it into the sub menu field in the menu object. Go to the FaceExpression and add a control and name it after one of the expressions. The type is Toggle and the parameter is FaceInt. Set the value to the corresponding animation.
The avatar is now ready to be published to VRchat!
Phys bones update – VRChat
Follow this: VRChat Avatar Dynamics Tutorial – PhysBones: https://youtu.be/PTTnWUkswkU